
Step by step tutorial Last updated: 2026-10-01
ediFabric .NET is a software development kit for .NET Framework and .NET Core, which makes it straightforward to parse, generate, validate, acknowledge, split, customize, or in other words, to programmatically manipulate EDI files. It is written in C# and is distributed as a NuGet package.
Step by step tutorial
The techniques you’ll learn in the tutorial are fundamental to building any EDI apps, and mastering them will give you a deep understanding of the C# EDI library.
The tutorial is divided into several sections:
- The How to represent EDI transactions will teach you the fundamentals of EDI Templates
- How to translate EDI files will teach you how to parse EDI files
- What to do with EDI template POCOs will teach you about the available operations such as EDI validation, create, save, and query a custom database for any EDI template, generate EDI acknowledgment, or export/import to/from JSON/XML/Custom CSV
- How to generate EDI files will teach you how to generate EDI files
Later sections cover those operations for EDI Template POCOs in more detail: EDI validation, EDI acknowledgment, creating DB structures to save and query, and serialize\deserialize to\from JSON & XML.
You don't have to complete all of the sections at once to get the value out of this tutorial. Try to get as far as you can - even if it's one or two sections.
Setup and prerequisites
You can see what we'll be building here:
The narrative will use primarily X12 examples; however, a link to the corresponding EDIFACT/HL7/NCPDP examples will be included for every section. We'll assume that you have some familiarity with EDI and X12, but you should be able to follow along even if you're new to EDI. We'll also assume that you're familiar with .NET and C#. To learn more about EDI go to our What is EDI article.
You'll also need Visual Studio to open the example solutions: Get Visual Studio.
How to represent EDI transactions
Now that you're set-up let's get an overview of ediFabric .NET C# Library!
ediFabric .NET is an efficient and flexible .NET C# library for building EDI applications. It lets you seamlessly convert between EDI files and C# instances, and can be incorporated into your Visual Studio solution(s) as a NuGet package.
ediFabric .NET has different components and features, but we'll start with the EDI Template, which is the core building block.
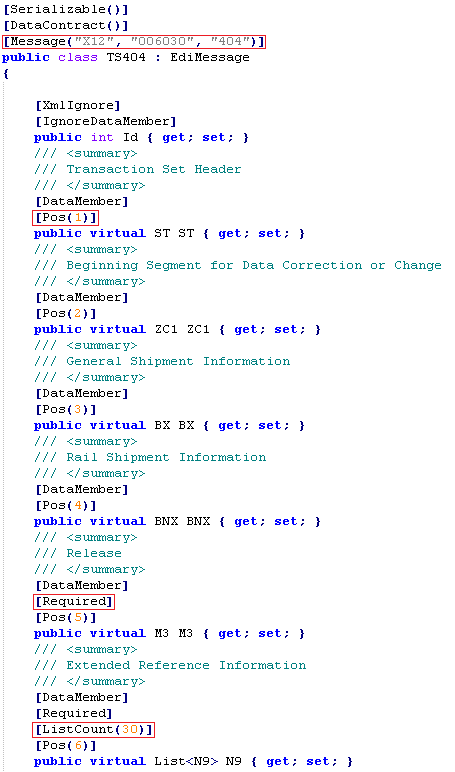
EDI Template is the name we've given to the C# model that represents an EDI transaction. In the EDI world, the format (or rule, or specification) of business documents (or transactions) is provided as some sort of a text or pdf file with diagrams and lists, like this:
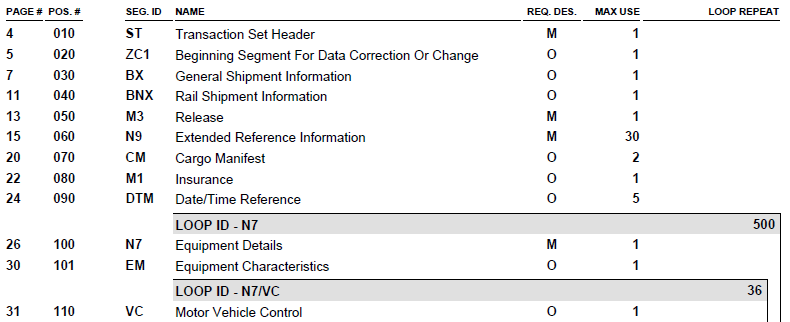
We've gone a step further and turned all this information into a simple class that is annotated with our EDI attributes and follows the same principle as the Data Annotations in ASP.NET MVC or Entity Framework like this:
Note
So, the most important concept of EdiFabric is a simple C# class, or model as in MVC, that inherits from our own EdiMessage and is comprised of properties annotated with our own EDI attributes.
Additional information
Great, now that we have established that our EDI transactions are represented with simple C# classes, let's see what we can use them for.
How to translate EDI files
The main feature of ediFabric .NET C# Library is to translate EDI files into C# instances (or EDI Template C# POCOs) and to generate EDI files from C# instances (of the same EDI Templates C# POCOs). In other words, the library extends .NET Framework and .NET Core with extra functionality for EDI files and EDI transactions.
In order to translate (or parse, or read in this case) an EDI file using ediFabric .NET C# Library, you'll need the following:
- The EDI file itself - download sample X12 file
- The EDI template(s) for the transaction(s) in the EDI file - download sample X12 template
- The EdiFabric NuGet package - Install
We'll use purchase order 850, version 4010 for the examples. It doesn't have to be an EDI file, the reader takes System.IO.Stream as an argument so any stream of EDI data can be parsed.
The act of translation is to go over the EDI file, identify each transaction or control segment and load the corresponding EDI Template, and finally parse the transaction data onto an instance of that EDI Template.
Let's assume that we want to translate the following file:
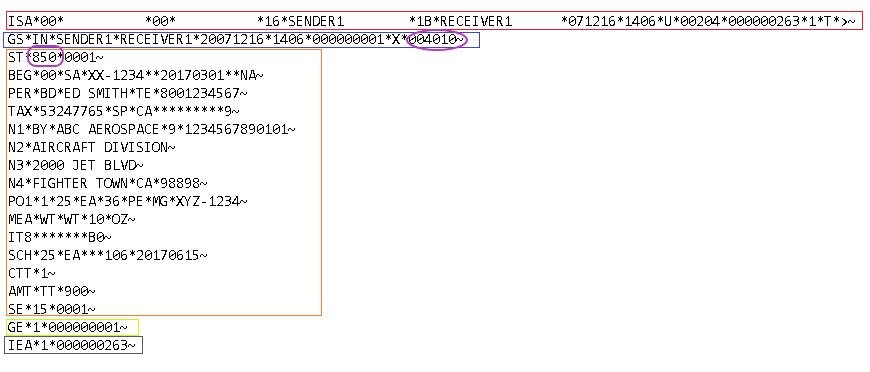
The parsing steps are:
-
Identify the header control segments
In this case, it's ISA and GS. All control segments are also represented by EDI Templates and are referenced from the EdiFabric.Core namespace. The information in the control segments is also used to determine the EDI delimiters (or separators) that must be used to parse the contents of the EDI interchange.
X12 Control Segments Object Reference
EDIFACT Control Segments Object Reference
-
Identify the transactions
In this case, it's a single purchase order (850 as denoted in the ST segment) of version 4010 (as denoted in the GS segment), all marked in purple.
This means that the block of data between the ST and the SE segment will be transposed into an instance of the EDI Template class that represents purchase order, version 4010.
How does the framework work this out? In the general case, it does that by matching the values from the file to the values in the MessageAttribute that is applied to the EDI Template class:
[Message("X12", "004010", "850")]
public class TS850 : EdiMessage
Note
So, to be able to translate EDI messages into C# instances, we need to know the C# classes for those instances beforehand.
It's a good practice to store all the templates for each EDI version in their separate project. Similarly, all partner-specific modifications of the standard templates should be moved into their own projects.
All EDI templates for a version share the same set of segment and data element classes, as well as EDI codes, and all of them implement common interfaces (for X12 and EDIFACT only). This allows you to implement any mapping logic over the interfaces, thus eliminating the duplication of the mapping code.
Let's get back to our example purchase order.
Code to parse EDI files
Create a new Console project following the Create the console steps in EDI templates.
After you finished it, your code in Program.cs should look like the following:
Stream edi = File.OpenRead(@"C:\PurchaseOrder.txt");

List<IEdiItem> ediItems;
using (var ediReader = new X12Reader(edi, "EdiFabric.Templates.X12"))
    ediItems = ediReader.ReadToEnd().ToList();

var purchaseOrders = ediItems.OfType<TS850>();
Change the path in File.OpenRead to the path of the sample purchase order file you downloaded earlier.
That's it, now run this in Debug mode and see the magic happen!
Example code in GitHub for all EDI standards
X12
EDIFACT
HL7
NCPDP
SCRIPT
VDA
Flat files
Inspect the code
What does the code do? Let's delve into the details.
- The first line loads the EDI data from the sample file into a System.IO.Stream.
- Then we declare a list of IEdiItem which will hold all of the control segments and transactions that the parser finds, in the order, they were found.
- Next, we create an instance of the X12Reader and pass two arguments to it:
- The stream of EDI data to parse
- The assembly name of the project where the corresponding EDI template will be instantiated from
- Finally, we call ReadToEnd(), which will read all the data in the sample file, from the beginning to the end
EDI reader main concepts
- It's a stream-based, forward-only reader, similar to XmlReader.
- All EDI items are presented in an ordered list, matching the order they appear in the file.
- There are two reading modes - ReadToEnd and Read, the latter allowing you to stream EDI item by EDI item for large EDI files (> 2MB).
- All read modes are provided in an async version as well.
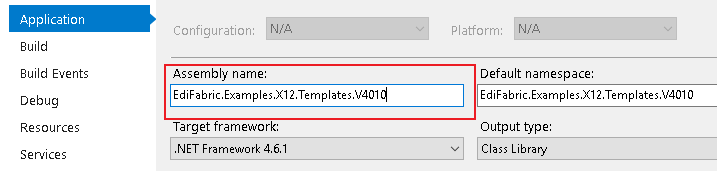
- The assembly name of a project can be found by right-clicking on the project name in Visual Studio and selecting Properties:
Additional information
How to parse large EDI files
We briefly mentioned that there are two reading modes - ReadToEnd and Read, together with their async counterparts. The reason for the existence of the two is to allow you to either translate a file at once (and have all the EDI items in a list in memory) or to read only one EDI item at a time.
Sometimes EDI files contain batches of transactions, for historical or other reasons, mixed or uni-type, but in large volumes. Plowing through large files requires careful resource planning and efficient streaming, which we are going to demonstrate in this section.
Open the Program.cs file we created in the previous step and add the following code:
Stream edi = File.OpenRead(@"C:\PurchaseOrder.txt");
using (var ediReader = new X12Reader(edi, "EdiFabric.Examples.X12.Templates.V4010"))
{
    while (ediReader.Read())
    {
         var po = ediReader.Item as TS850;
         if (po != null)
         {
             ProcessPurchaseOrder(ediReader.CurrentInterchangeHeader,
                                  ediReader.CurrentGroupHeader,
                                  po);
         }
    }
}

private static void ProcessPurchaseOrder(ISA isa, GS gs, TS850 purchaseOrder)
{
 // Do something with the purchase order
}
Change the path in File.OpenRead to the path of the sample purchase order file you downloaded earlier.
Example code in GitHub for all EDI standards
X12
EDIFACT
HL7
NCPDP
SCRIPT
VDA
Flat files
Inspect the code
What does the code do? Loading the EDI file into a stream, and creating the X12Reader, are the same as the last example. The difference is in the reading mode:
- Use Read() instead of ReadToEnd() in a while loop
- Each iteration will return an EDI item, so for our sample file there will be 5 iterations with 5 EDI items returned:
- ISA
- GS
- The only purchase order or 850
- GE
- IEA
- The current item can be accessed by ediReader.Item where the type of the item determines which transaction or control segment it is
- The items we are interested in can be processed (it's a good idea to offload that processing asynchronously or in a different thread) downstream and then disposed of as the file is being read.
- Each current item holds references to its ISA (ediReader.CurrentInterchangeHeader) and GS (ediReader.CurrentGroupHeader) as well as the delimiters used (ediReader.Separators) and the offset of bytes from the start of the reading operation (ediReader.BytesRead)
Note
Sometimes the transactions themselves are large and contain EDI loops that repeat multiple times (for example patient data for all patients in a hospital). In this situation, the streaming won't do much good and the transaction itself will need to be broken into parts. This is called splitting and you can learn more about it in Translate Large EDI messages by splitting.
Now that we've covered the EDI translation techniques, let's move on and do something useful with the EDI transaction C# instance.
What to do with EDI template POCOs
The diagram below colorfully depicts the main operations:
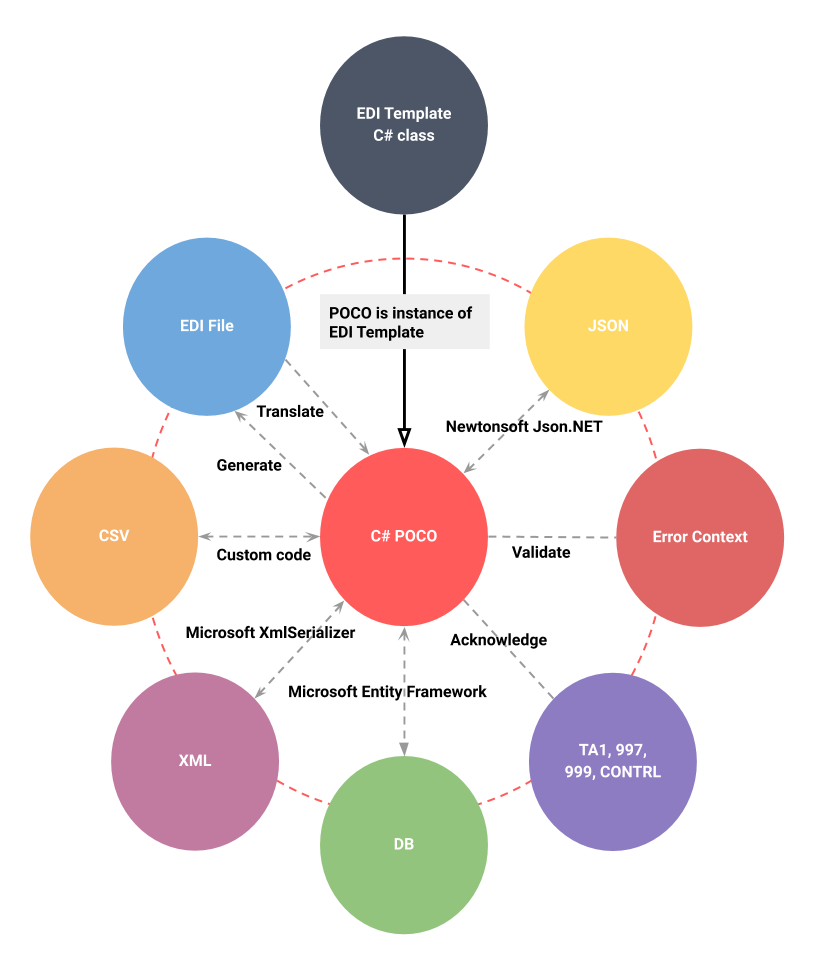
As you can see, the EDI Template C# POCO (or POCO-like if we want to be precise because it does depend on our DOM attributes and base class, but let's not be overly meticulous) is at the center of all operations.
Once you have the POCO, either by reading an EDI file or by manually instantiating and populating it, you can immediately:
- Write it out to an EDI file (or a stream for that matter)
- Save it to a database using Microsoft Entity Framework
- Validate it for the relevant EDI compliance, such as the HIPAA Snip Levels
- Serialize it to JSON using Newtonsoft Json.NET
- Generate acknowledgments such as 997 or 999 (on the whole interchange or group, which covers more than the single transaction)
- Serialize it to XML using Microsoft XmlSerializer
- Export it to CSV using custom code and file format
- Map it to another POCO or domain object
- Process it downstream to another application or service, etc.
As part of this tutorial, we'll demonstrate writing an EDI file next. The other operations are covered in How to validate EDI objects, Generate EDI acknowledgments, EDI files to a database, Convert between EDI and JSON, and Convert between EDI and XML.
How to generate EDI files
My trading partner wants me to send her EDI files, can I do that with EdiFabric? Does this sound familiar, or at least some of it? If yes, then read on.
Having learned about the EDI Templates, we can happily assume that if we can instantiate the correct EDI Template for the transaction and version we need, and populate it with data, we can then somehow turn it into an EDI file.
So, generating (or creating) an EDI file is a two-step process:
- Create an instance of the EDI template and populate it
- Write the instance(s) to an EDI file (or stream)
Create an instance of the EDI template and populate it
The data to go out to a trading partner usually originates in a domain entity, internal database, CSV file, XML output, or service response in JSON. Whatever the case, the data will need to be mapped to an EDI Template. There are multiple approaches to this; however, the topic of converting data structures from one to another is outside the scope of our discussion.
The general idea is to reuse the existing mapping pattern for all other, non-EDI, processes in your other (personal or work) projects and to apply it for EDI as well.
We'll use invoice, 810, version 4010 for the examples. Here are some instantiation\mapping ideas which might be useful pointers:
- Custom code to generate X12 810
- Pull from database
- Deserialize to EDI from JSON
- Deserialize to EDI from XML
- Import to EDI from CSV
- Map to EDI from XML using XSLT
- Map to EDI from another POCO using AutoMapper
To recap: let's say that you need to send an EDI file to a trading partner that contains an invoice, 810 in version 4010, as a response to a previously received purchase order from that same trading partner.
You've pulled the invoice from your invoicing system in some format, and converted it to its corresponding EDI Template instance. That is, step 1 completed.
Write the instance(s) to an EDI file (or stream)
To create the destination EDI file, we'll use the EdiWriter. Once you have the file, you can transport it to the recipient; however, the communication part is not a feature of EdiFabric.
Create a new Console project following the Create the console steps in EDI templates.
Open Program.cs and add the following code:
var transaction = BuildInvoice("1");

using (var stream = new MemoryStream())
{
    using (var writer = new X12Writer(stream))
    {
        writer.Write(SegmentBuilders.BuildIsa("1"));
        writer.Write(SegmentBuilders.BuildGs("1"));
        writer.Write(transaction);
    }

    string edi = stream.LoadToString();
}
Example code in GitHub for all EDI standards
X12
EDIFACT
HL7
NCPDP
SCRIPT
VDA
Flat files
Inspect the code
The first line creates an invoice POCO by manually instantiating an 810, version 4010, and populating it with hard-coded data. In reality, this will be the end product of a mapping component\code\routine\deserialization\etc.
Then:
- A new MemoryStream is created (it could be any stream really, such as FileStream, etc.). This is where all the EDI data will be written to
- Next, an instance of the X12Writer is created, taking the stream as a parameter
- Then, write to the stream beginning with the ISA segment:
public static ISA BuildIsa(string controlNumber,
            string senderId = "SENDER1",
            string senderQ = "14",
            string receiverId = "RECEIVER1",
            string receiverQ = "16",
            string ackRequested = "1",
            string testIndicator = "T")
{
	return new ISA
	{
		//  Authorization Information Qualifier
		AuthorizationInformationQualifier_1 = "00",
		//  Authorization Information
		AuthorizationInformation_2 = "".PadRight(10),
		//  Security Information Qualifier
		SecurityInformationQualifier_3 = "00",
		//  Security Information
		SecurityInformation_4 = "".PadRight(10),
		//  Interchange ID Qualifier
		SenderIDQualifier_5 = senderQ,
		//  Interchange Sender
		InterchangeSenderID_6 = senderId.PadRight(15),
		//  Interchange ID Qualifier
		ReceiverIDQualifier_7 = receiverQ,
		//  Interchange Receiver
		InterchangeReceiverID_8 = receiverId.PadRight(15),
		//  Date
		InterchangeDate_9 = DateTime.Now.Date.ToString("yyMMdd"),
		//  Time
		InterchangeTime_10 = DateTime.Now.TimeOfDay.ToString("hhmm"),
		//  Standard identifier
		InterchangeControlStandardsIdentifier_11 = "U",
		//  Interchange Version ID
		//  This is the ISA version and not the transaction sets versions
		InterchangeControlVersionNumber_12 = "00204",
		//  Interchange Control Number
		InterchangeControlNumber_13 = controlNumber.PadLeft(9, '0'),
		//  Acknowledgment Requested (0 or 1)
		AcknowledgementRequested_14 = ackRequested,
		//  Test Indicator
		UsageIndicator_15 = testIndicator,
	};
}- Followed by the GS segment:
public static GS BuildGs(string controlNumber,
            string senderId = "SENDER1",
            string receiverId = "RECEIVER1")
{
	return new GS
	{
		//  Functional ID Code
		CodeIdentifyingInformationType_1 = "IN",
		//  Application Senders Code
		SenderIDCode_2 = senderId,
		//  Application Receivers Code
		ReceiverIDCode_3 = receiverId,
		//  Date
		Date_4 = DateTime.Now.Date.ToString("yyMMdd"),
		//  Time
		Time_5 = DateTime.Now.TimeOfDay.ToString("hhmm"),
		//  Group Control Number
		//  Must be unique to both partners for this interchange
		GroupControlNumber_6 = controlNumber.PadLeft(9, '0'),
		//  Responsible Agency Code
		TransactionTypeCode_7 = "X",
		//  Version/Release/Industry id code
		VersionAndRelease_8 = "004010"
	};
}- Lastly, we write our invoice out
Note
You don't need to close the group (write GE segment) or the interchange (write the IEA segment), the X12Writer does that automatically for you.
Note
By default, the writer uses the standard separators. If you want to use different separators don't set it in the ISA object, but use the Separators object when writing the ISA out.
The stream now contains our EDI data and we can write it out to a file, turn it into a string or do anything else we want with it.
Additional information
What you have built so far
Congratulations! You've created code that translates EDI files and generates EDI files.
Nice work! We hope you now feel like you have a decent grasp on how ediFabric .NET works.
So far, this tutorial has covered EDI templates, parsing EDI files, and generating EDI files. The rest of the page builds on those.
Continue with How to validate EDI objects, then acknowledgments, saving to a database, and JSON and XML.
How to validate EDI objects
These operations assume you are familiar with EDI templates, C# POCOs, and how to translate or generate EDI files.
Accuracy is one of the selling points when employing EDI processes within any enterprise. To be able to validate data before it is sent out according to the same criteria as the receiver expects it, well, that saves a lot of roundtrips and delays. Proper validation of EDI documents is essential for businesses and allows them to exchange data rapidly and reliably, thus gaining them a significant competitive advantage.
Validating EDI messages is the same as validating C# models, as in MVC
Touching on the notion of EDI Templates, validation follows the same principle as Microsoft's own data annotations for model validation (MVC) or entity validation (Entity Framework). Just like when the template attributes are applied to a simple C# class to turn it into EDI Template, another set of our own attributes can be applied to the template classes and properties, enabling them for validation.
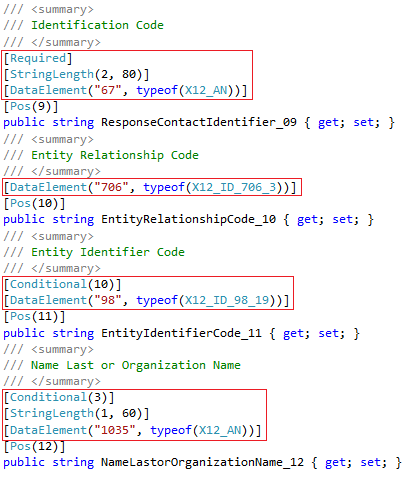
These validation attributes allow us to reflect the EDI rules from the specifications to the template classes and the validation operation IsValid() in ediFabric .NET to take care of enforcing them and providing appropriate error information back to the consumer.
Validation attributes
- Required
- ListCount
- StringLength
- DataElement
See EDI template validation attributes.
Conditional validation attributes:
- Conditional
- ConditionalAny
- Exclusion
- Paired
- RequiredAny
Go to the EDI Conditional Validation Attributes article
So, the validation of EDI transactions is a two-step process:
- Apply validation attributes to classes and properties according to the EDI implementation guideline (standard or partner-specific, or both). Being simple classes, EDI templates can have multiple versions, per partner or EDI version, which will be loaded accordingly by the library.
- Execute the validation. This is done by calling IsValid() on any POCO deriving from EdiMessage
Code to validate EDI transactions
Create a new Console project following the Create the console steps in EDI templates.
After you finished it, open Program.cs and add the following code:
Stream edi = File.OpenRead(@"C:\\PurchaseOrder.txt");

List<IEdiItem> ediItems;
using (var reader = new X12Reader(edi, "EdiFabric.Templates.X12"))
	ediItems = reader.ReadToEnd().ToList();

var purchaseOrders = ediItems.OfType<TS850>();

foreach (var purchaseOrder in purchaseOrders)
{
	//  Validate
	MessageErrorContext errorContext;
	if (!purchaseOrder.IsValid(out errorContext))
	{
		var errors = errorContext.Flatten();
	}
	else
	{
		//  purchaseOrder is valid, handle it downstream
	}
}
Change the path in File.OpenRead to the path of the sample purchase order file you downloaded earlier.
That's it, now run this in Debug mode and see the magic happen!
Example code in GitHub for all EDI standards
X12
EDIFACT
HL7
NCPDP
SCRIPT
Inspect the code
What does the code do? Let's go into the details.
- The lines before the foreach statement simply translate the sample EDI file into a list of C# objects (EDI items).
- Then we use the standard .NET OfType<> method to pull the objects we are interested in, by type
- Finally, the foreach statement iterates through all the purchase orders from the EDI file and each of them is individually validated with the IsValid() method.
- For the invalid messages, a MessageErrorContext object is supplied, which contains the location and reason for the invalid loop, segment, or data element.
That's it really. A simple method to kick off an elaborate validation process under the hood and report back any wrong findings in a structured, EDI-friendly manner.
Validating external EDI data element code sets
EDI data element code sets are values within the range accepted by the EDI transaction, such as 'delivery type', 'post code', 'currency code'. Some EDI fields contain a code value, and only a certain set of codes are valid under the EDI standard.
Often, trading partners introduce their own EDI codes that are different than the standard ones for X12 or EDIFACT. ediFabric .NET maintain the code lists in the EDI template. These modifications are easily supported in ediFabric .NET by either:
- Creating a separate copy of the EDI Template for each partner, and modifying the EDI code sets in the copy
- Using external EDI codes map when validating EDI messages
The standard EDI templates can be copied per trading partner and then each copy can be modified to adhere to the partner specifications. This is useful when partner formats deviate substantially from the standard.
When the changes are only contained to the EDI codes, then an EDI code map can be used, leaving the rest of the template untouched.
EDI data element code sets example
Let's assume that Partner A specifies custom EDI Codes for the Transaction Set Purpose Code X12_ID_353. The standard definition for X12, version 4010 is:
[EdiCodes(",00,01,02,03,04,05,06,07,08,10,11,12,13,14,15,16,17," +
"18,19,20,21,22,24,25,26,27,28,30,31,32,33,34,35,36,37,38,39,40,41,42,43,44," +
"45,46,47,48,49,50,51,52,53,54,55,5,6,5C,77,CN,CO,EX,GR,PR,RH,RV,SU,ZZ,")]
public class X12_ID_353
{
}
Another partner, Partner B, however, defines it as a set of only two, not included in the standard, values. In the same EDI template, create a separate class, X12_ID_353_PartnerB, for this particular code set.
[EdiCodes(",PA,PB,")]
public class X12_ID_353_PartnerB
{
}
By default when the EDI Template for the standard 850 is used (the Partner A version), calling IsValid() will check the values from X12_ID_353, but we want it to check against the values from X12_ID_353_PartnerB, when validating messages from Partner B.
This is possible by including an EDI code map as a parameter to IsValid().
In the same Program.cs, change the code to:
Dictionary<Type, Type> codeSetMap = new Dictionary<Type, Type>();
codeSetMap.Add(typeof(X12_ID_353), typeof(X12_ID_353_PartnerB));

purchaseOrder.IsValid(out errorContext,
     new ValidationSettings { DataElementTypeMap = codeSetMap });
The changes are:
- The first two lines define the EDI Code map, which is a dictionary mapping the source to the destination EDI Code type. This way when the validation logic encounters the source type it will apply the validation according to the destination type.
- Pass that EDI Code map to IsValid() as DataElementTypeMap in ValidationSettings.
Additional information
Generate EDI acknowledgments
In the previous section, we mentioned the importance of accuracy in the exchange of business documents. Validation is a nifty way for a receiver to discern the quality of the data received, however in the cases it is poor, how would it report it back to the sender? What would be a standard way to let the sender that the data was received and it is of a sufficient (or not) quality?
What are EDI Acknowledgments
EDI Acknowledgments are a standard approach, implemented as part of the EDI communication, to acknowledge receipt and data consistency between trading partners. Broadly speaking, there are two types of acknowledgments - technical, which confirms the receipt of an interchange called TA1 for X12, CONTRL for EDIFACT, and functional, which confirms that the data received was recognized by the receiver and can be parsed\processed, and are called 997 for X12 and CONTRL for EDIFACT. EDIFACT uses the same transaction but different segments are transmitted when used as technical or functional ack.
Note
ediFabric .NET generates EDI acknowledgments as C# POCOs, and raises them as events, whilst still reading the EDI file
ediFabric .NET employs a parallel approach when dealing with acknowledgments, meaning that whilst an EDI file is still being translated, acknowledgments will be raised via .NET events as functional groups and interchanges are encountered. This allows the consumer to do both operations, translation, and acknowledgment, in parallel and potentially in separate threads, thus providing a non-blocking and fast mechanism to respond immediately and to maintain a single acknowledgment in-memory.
Technical, functional, and implementation EDI acknowledgments
Let's acknowledge our sample EDI file which had the following structure:
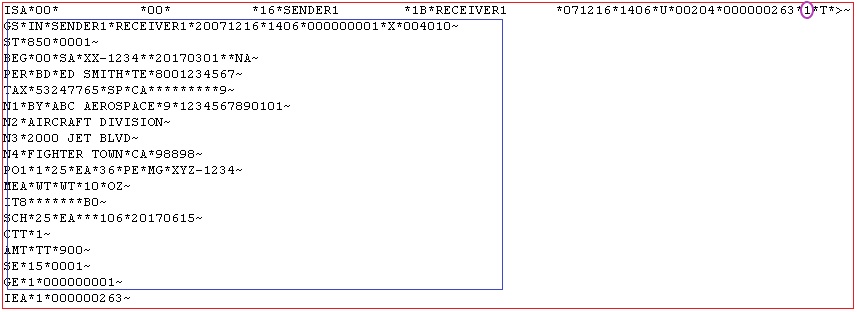
A TA1 (X12 technical acknowledgment) will be created for each interchange (ISA\IEA block). A 997 (or 999) will be created for each functional group (GS\GE block). The ISA segment also contains a flag (in purple) telling us whether the sender expects an acknowledgment or not. This flag can either be honored or ignored or overridden depending on the agreement between the partners.
Code to generate X12 TA1 and 997 acknowledgments
Create a new Console project following the Create the console steps in EDI templates.
After you finished it, open Program.cs and add the following code:
var edi = File.OpenRead(@"C:\PurchaseOrder.txt");

var settings = new AckSettings
{
    AckHandler = (s, a) =>
    {
	var tsTa1 = a.Message as TSTA1;
	var ts997 = a.Message as TS997;

	if (tsTa1 != null)
	{
	    // a.Message is TA1
	}

	if (ts997 != null)
	{
	    //  Inspect the acknowledgment
	    var ackCode = ts997.AK9.FunctionalGroupAcknowledgeCode_01;

	   var ack = AckBuilders.BuildAck(a.InterchangeHeader,
                                          a.GroupHeader,
                                          ts997, AckVersion.X12_997);
	}
    },
    MessageHandler = (s, a) =>
    {
	if (!a.ErrorContext.HasErrors)
	{
	}
    },
    AckVersion = AckVersion.X12_997
};

using (var ackMan = new Plugins.Acknowledgments.X12.AckMan(settings))
{
    using (var ediReader = new X12Reader(edi,
                                    "EdiFabric.Templates.X12"))
    {
	while (ediReader.Read())
		ackMan.Publish(ediReader.Item);
    }
}
Change the path in File.OpenRead to the path of the sample purchase order file you downloaded earlier.
Example code in GitHub for all EDI standards
X12
EDIFACT
Inspect the code
It begins with creating an instance of AckSettings which holds references to the bodies of the events where the acknowledgments will be raised. This example defines them inline but you can code it in your preferred way. AckSettings defines two event handlers:
- AckHandler - where all events will be raised, both technical and functional
- MessageHandler - where each POCO will be reported, e.g. our purchase order in this case
The reason for having a separate handler for the transactions is to be able to process them in it, as opposed to in the EDI reader while loop because:
- The will be validated already
- They will be checked for duplicates
- They will be marked as being in a duplicate functional group or interchange
If you need to ensure any of the 3 points above are valid before processing the transaction downstream, then do so in the MessageHandler .
The AckHandler provides the acks as POCOs (all EDI Templates for the standard acknowledgments can be referenced from EdiFabric.Core), so you can inspect or manipulate them at this stage. You can then generate a final EDI acknowledgment using the EDI Generation routine in How to generate EDI files. The original ISA and GS are also included in the event so you can reuse some of the information to create their response counterparts if needed. With that information at hand, the EDI acknowledgment can be turned into a string or written out to a file.
The last step is how to actually inject that AckSettings instance as part of the reader, or any list of EDI items for that matter? You need to create an instance of AckMan taking the AckSettings as a parameter.
using (var ackMan = new Plugins.Acknowledgments.X12.AckMan(settings))Then whilst you read, add the extra step of publishing the currently read item to AckMan
while (ediReader.Read())
    ackMan.Publish(ediReader.Item);
Note
You don't need to validate the transactions separately, they are already validated when raised in the MessageHandler.
Note
The ack object in AckHandler is a normal POCO, an instance of an EDI Template.
Additional information
EDI files to a database
Using Entity Framework Migrations, you can automatically create a database structure for all X12 and EDIFACT EDI templates, sharing segments and complex data elements across all transactions in the same version.
Each EDI Template is prepared for use with Entity Framework:
- Id property is included for every class, to serve as a primary key
- Complex properties are defined as virtual
- Collections of properties are defined as List<>
- A separate DB context is provided for each EDI version
It's amazing how quickly you can create a new database and start saving EDI transactions to it.
Let's demonstrate it:
Create a database for EDI transactions and save an EDI message to it
Create a new Console project following the Create the console steps in EDI templates, and install Entity Framework.
Then add the DbContext.cs file for version 4010 to that project.
The DbContext.cs file contains System.Data.Entity.DbSet for every EDI Template in the selected EDI version, however for our example we only need the purchase order and you'll have to manually remove all other DbSets pointing to items that are not included.
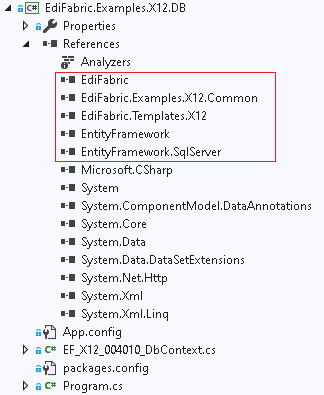
Excellent, so we have our Entity Framework DB context ready, let's use it.
Open Program.cs and add the following code:
Stream edi = File.OpenRead(@"C:\\PurchaseOrder.txt");

List<IEdiItem> ediItems;
using (var reader = new X12Reader(edi, "EdiFabric..Templates.X12"))
    ediItems = reader.ReadToEnd().ToList();

var purchaseOrders = ediItems.OfType<TS850>();

using (var db = new X12Context())
{
    db.TS850.AddRange(purchaseOrders);
    db.SaveChanges();
}
Change the path in File.OpenRead to the path of the sample purchase order file you downloaded earlier.
Example code in GitHub for all EDI standards
X12
EDIFACT
Inspect the code
The top part reads our sample EDI file. Once we have all the purchase order POCOs, we create an instance of the DB Context, add the purchase orders to the TS850 entity and finally save it to the database.
The save operation will create the database structure the first time it is executed:
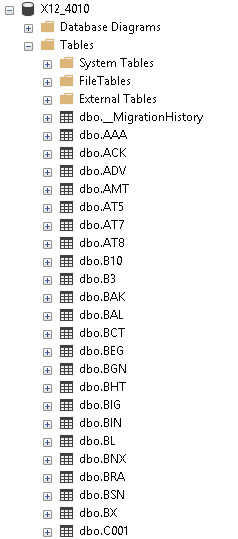
Note
Edit the connection string to point to a specific SQL Server instance.
That's it. Now you can enjoy the full power of Entity Framework to query and maintain the database.
Convert between EDI and JSON
Are any additional operations required to convert between EDI and JSON? Not at all. EDI data, transactions, and control segments are represented as C# POCOs, hence you can use the familiar Newtonsoft Json.NET to serialize to JSON and deserialize from JSON.
Create a new Console project following the Create the console steps in EDI templates
Open Program.cs and add the following code:
List<IEdiItem> ediItems;
using (var reader = new X12Reader(edi, "EdiFabric.Examples.X12.Templates.V4010"))
    ediItems = reader.ReadToEnd().ToList();

var purchaseOrders = ediItems.OfType<TS850>();

foreach (var transaction in transactions)
{
    string json = Newtonsoft.Json.JsonConvert.SerializeObject(transaction);
}
Change the path in File.OpenRead to the path of the sample purchase order file you downloaded earlier.
Example code in GitHub for all EDI standards
X12
EDIFACT
HL7
NCPDP
SCRIPT
Inspect the code
The top part reads our sample EDI file. Then we iterate through each purchase order in the EDI file and convert it to JSON using the functionality provided in Json.NET.
Deserialization is the other way around, we take a JSON that conforms to the EDI Template for 850 and deserialize it to C# POCO, again, using Json.NET.
var purchaseOrder = Newtonsoft.Json.JsonConvert.DeserializeObject<TS850>(json);Additional information
Convert between EDI and XML
Similar to converting between EDI and JSON, we can use the familiar XmlSerializer and DataContractSerializer to convert between EDI and XML.
Create a new Console project following the Create the console steps in EDI templates
Open Program.cs and add the following code:
List<IEdiItem> ediItems;
using (var reader = new X12Reader(edi, "EdiFabric.Examples.X12.Templates.V4010"))
    ediItems = reader.ReadToEnd().ToList();

var purchaseOrders = ediItems.OfType<TS850>();

foreach (var transaction in transactions)
{
    var xml = Serialize(transaction);
}
public static XDocument Serialize(EdiMessage instance)
{
    if (instance == null)
        throw new ArgumentNullException("instance");

    var serializer = new XmlSerializer(instance.GetType());
    using (var ms = new MemoryStream())
    {
        serializer.Serialize(ms, instance);
        ms.Position = 0;
        return XDocument.Load(ms, LoadOptions.PreserveWhitespace);
    }
}
Change the path in File.OpenRead to the path of the sample purchase order file you downloaded earlier.
Example code in GitHub for all EDI standards
X12
EDIFACT
HL7
NCPDP
SCRIPT
Inspect the code
The top part reads our sample EDI file. Then we iterate through each purchase order in the EDI file and convert it to XML using the functionality provided in XmlSerializer.
Deserialization is the other way around, we take an XML that conforms to the EDI Template for 850 and deserialize it to C# POCO, again, using XmlSerializer.
var purchaseOrder = Deserialize<TS850>(xml);
public static T Deserialize<T>(XElement xml)
{
    var serializer = new XmlSerializer(typeof(T));
    return (T)serializer.Deserialize(xml.CreateReader());
}
Additional information
Final Words
Congratulations again! You've created code that validates EDI transactions, acknowledges EDI interchanges and groups, creates DB structure to save and query EDI transactions, and serializes\deserializes to\from JSON & XML.
For a more detailed explanation of each of these topics, check out the rest of the documentation.